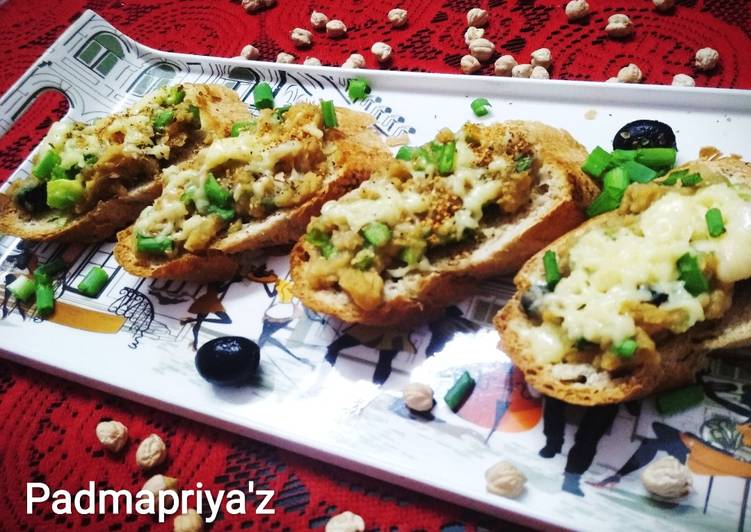
Hey everyone, hope you’re having an incredible day today. Today, I’m gonna show you how to make a special dish, chickpeas and cheese bruschetta. One of my favorites food recipes. For mine, I will make it a little bit unique. This is gonna smell and look delicious.
Chickpeas and Cheese Bruschetta is one of the most popular of recent trending foods on earth. It’s appreciated by millions daily. It is simple, it’s quick, it tastes yummy. They are fine and they look wonderful. Chickpeas and Cheese Bruschetta is something which I’ve loved my whole life.
Great recipe for Chickpeas and Cheese Bruschetta. #themagiconplates #mysteryweek This is a great starter recipe to be served with soups and salads. This is a good choice for kids lunch boxes as it has good amount of protein also in it. Inspired by a traditional bruschetta, but using curried chickpeas and shredded mixed cheese instead of mozzarella, this was going to be something that would be perfect with our glass of Rioja.
To begin with this recipe, we have to prepare a few components. You can have chickpeas and cheese bruschetta using 10 ingredients and 7 steps. Here is how you cook it.
The ingredients needed to make Chickpeas and Cheese Bruschetta:
- Make ready 1 loaf Baguette Bread
- Make ready 1/2 cup Chole Chickpeas
- Prepare 1/2 cup Grated Mozzarella
- Make ready 1 Green Capsicum
- Take 1 medium Onion
- Prepare 12-15 Black Olives
- Make ready 1/2 tbsp Lemon juice
- Take 1/2 cup Spring Onion Greens
- Take 2 Garlic pods
- Get as required Butter or Olive oil for toasting bread
This simple, bold and bursting with fresh flavor chickpea bruschetta will please everyone's tastes in no time. Plus, smashed chickpeas with sun-dried tomatoes make a scrumptious topping when fresh cherry tomatoes are still out of season and flavorless. Using the authentic Italian cheese (in a lesser amount than the original's ½ cup) ensures a cheesy richness in the makeover with less fat and calories. Common olive oil works better for cooking at high heat than virgin or extra-virgin oil.
Instructions to make Chickpeas and Cheese Bruschetta:
- Soak the Chickpeas overnight. Cook them with a pinch of baking soda for 20 mins. Alternatively you can use tinned garbanzo beans. Drain the water in them and wash once. Pressure cook them with cooking soda for 5 mins.
- Mash the Chickpeas slightly, do not blend them as they should have some texture.
- Add chopped onions, capsicum, Olives, spring onion greens, salt, Italian seasoning, a tsp of olive oil and lemon juice. Mix everything well.
- Cut the garlic pod into half. Squeeze it between your fingers and apply the juice onto the roasted bread directly. This infuses great garlicky taste to the bread.
- Apply a layer of chickpea paste on the bread. Drizzle a few drops of olive oil on it. Toast it again for 2 mins.
- Add grated cheese on the toasts. Sprinkle some more seasonings on the breads. Grill the bread for another minute till the cheese starts melting.
- Enjoy the Chickpeas Cheese Bruschetta as a starter with salad or soups or as is it.
Mash chickpeas with peppers and feta; spoon over melba toast and garnish with parsley. Cheese Stock With a tin of chickpeas in the pantry, yesterday's bread needing to be used, and some bacon, feta and greens from the fridge, you can put together this delicious and easy meal in a matter of minutes. Place the chickpeas mango mixture on the bruschetta bread. Add the grated mozzarella cheese on the top. Why I Love This Nut-Free Chickpea 'Cheese' Sauce.
So that’s going to wrap it up with this exceptional food chickpeas and cheese bruschetta recipe. Thanks so much for your time. I am confident that you will make this at home. There is gonna be more interesting food at home recipes coming up. Don’t forget to bookmark this page in your browser, and share it to your family, friends and colleague. Thank you for reading. Go on get cooking!